
Quick answer: Duplicate the ClickFunnels page you want to test, create and save a PostHog experiment, then create a control and test elements on the cloned page. Hide the test elements with Custom CSS, add the A/B test script in the footer, and quality-check each variant with its feature flag key before adding a primary metric and launching the experiment.
Requirements:
- You have an active PostHog account with login credentials.
- Your ClickFunnels site has the PostHog script installed.
Due to the complexity of this A/B test, we included an extra step to create test elements directly on the page. In simpler cases, you can skip this by applying changes through the A/B test script alone; no need to add extra elements manually.
Step 1: Duplicate the Page You Want to Test
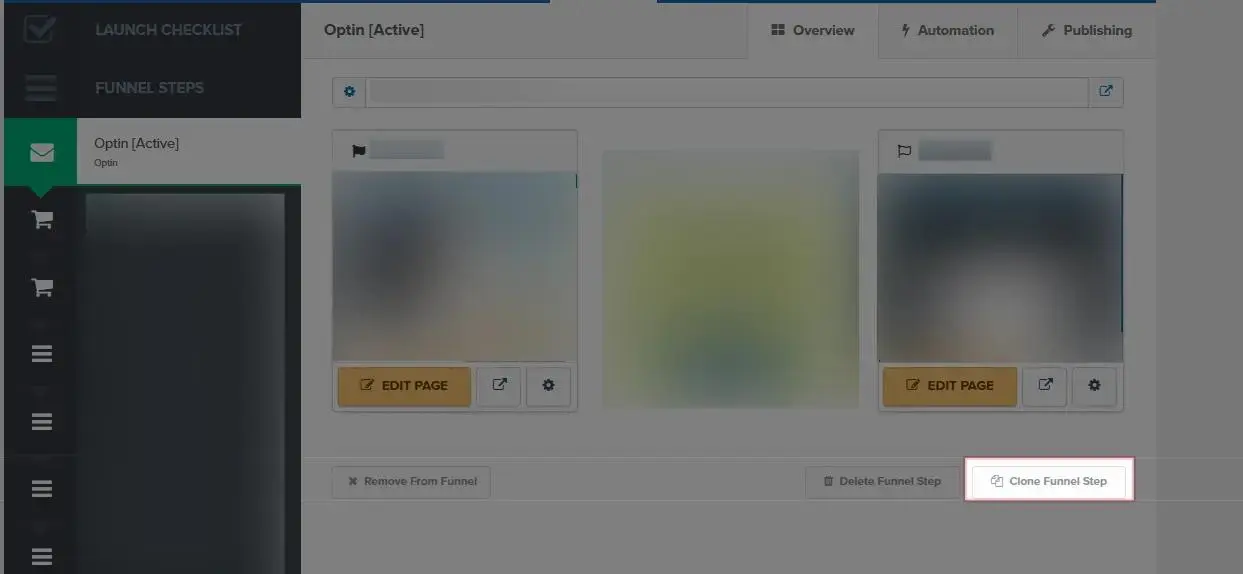
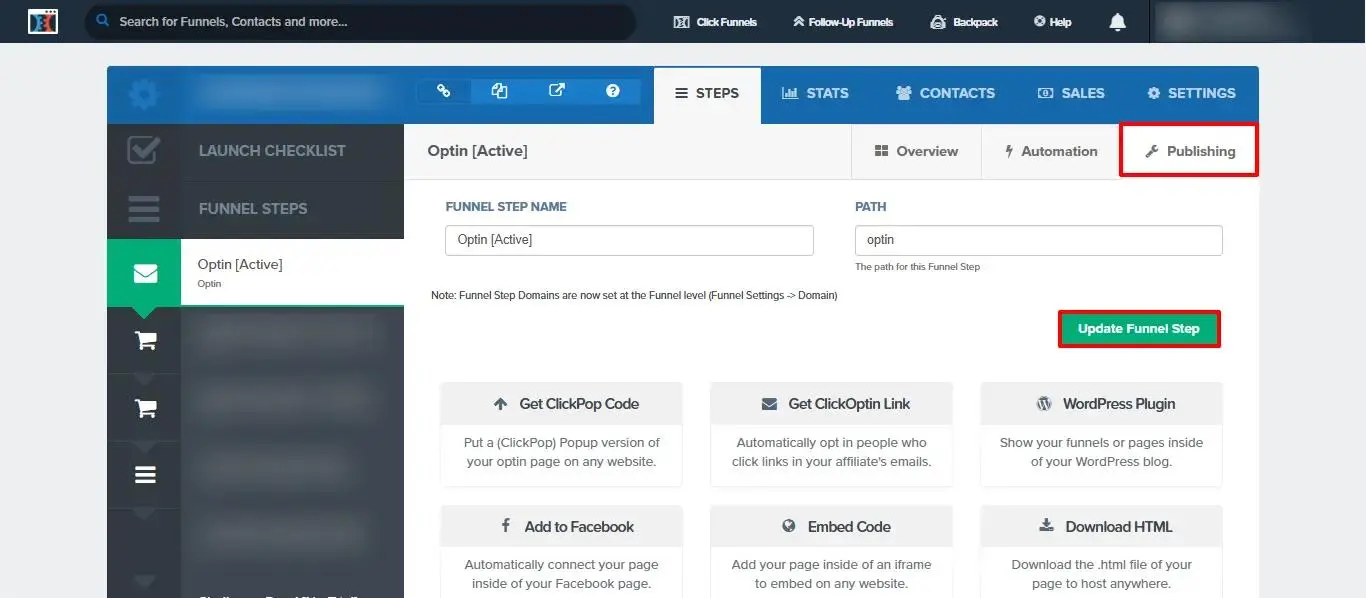
Log in to your ClickFunnels account. Duplicate the intended page by clicking on the Clone Funnel Step button. Once the page reloads, go to the Publishing tab and give the cloned step a unique name. Click Update Funnel Step to save.
By duplicating the page, you protect the original from unintended changes.
Step 2: Create Your Experiment in PostHog
- Log into PostHog.
- From the left sidebar, go to Experiments > click New Experiment
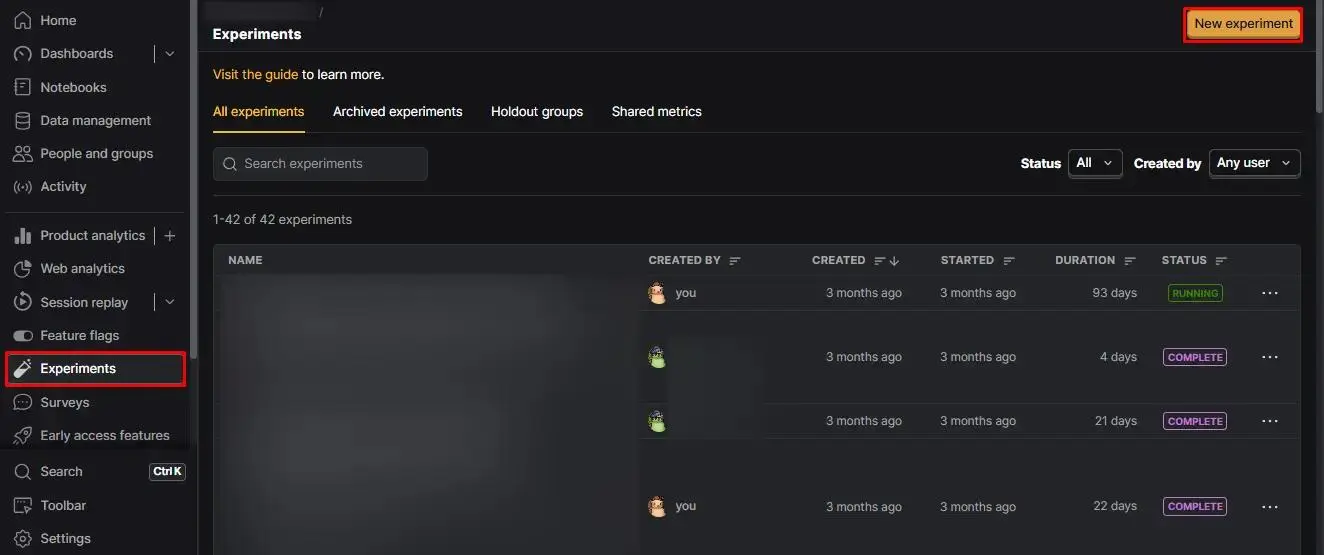
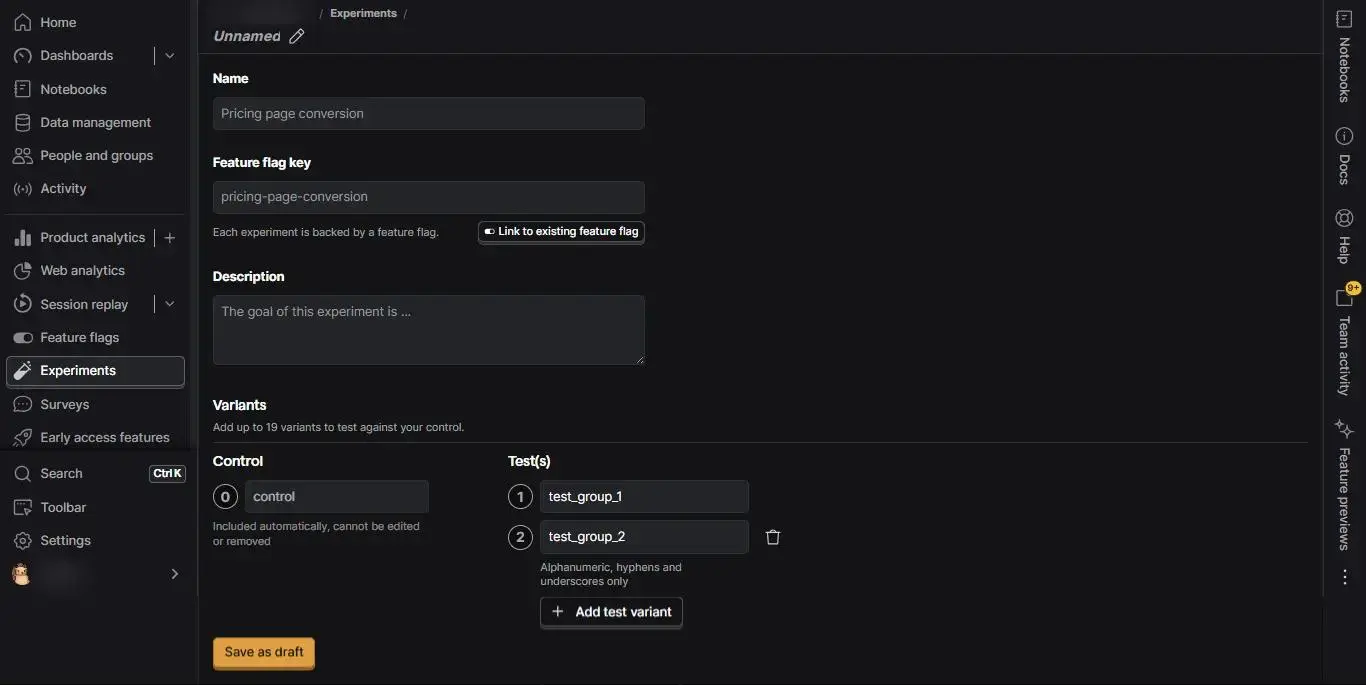
Fill in the required fields:
We use this general format for experiment name:
[Experiment number] – [Step of the Funnel/Page] – [Test Hypothesis]
For Feature flag key, we use something very similar to the Experiment name, with a few changes—like converting the step of the funnel/page into a number or abbreviation, removing spaces, and keeping everything lowercase for easier implementation in code.
Refer to this PostHog Experiment Naming Guidelines for best practices.
Click Save as draft.
For a step-by-step guide on creating an experiment in PostHog, click here.
Step 3: Create the Test Element You Want to Test in ClickFunnels
To experiment with multiple content versions on the same page layout (assuming we have two test groups):
We have 2 scenarios for preparing test elements:
1. We don’t have the element on the page and it should be built from scratch;
2. The element already exist but it should be modified for the test, in this case, the element can be duplicated and changed. This prevents unnecessary changes of the element and helps to limit the difference of the elements other than the hypothesis, leading to a clean test.
- Label the original as Control
- Label the test versions as TG1, TG2, etc.
Depending on what you’re testing, the test group can be an element, section, row, or column.
Step 4: Hide Test Groups with Custom CSS
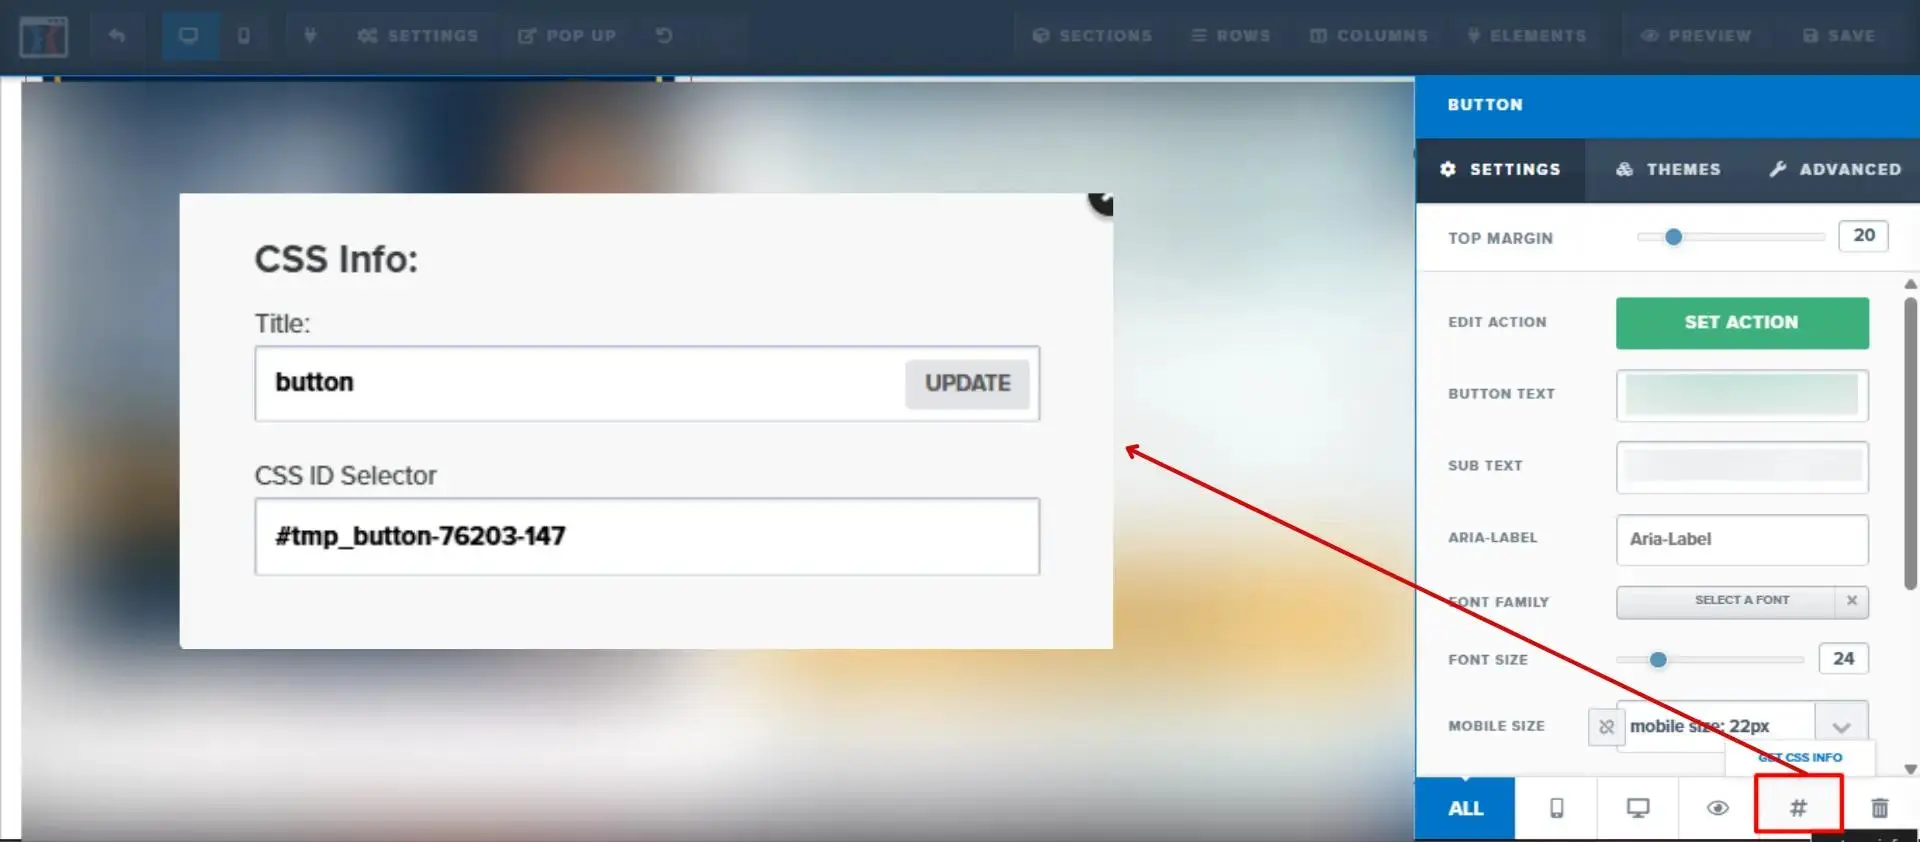
We need to hide the test elements on the Control page to manage the test by the script in the footer.(See next step) To do so, fetching the CSS ID of each element is essential.
How to Find Each Element’s CSS ID:
- Click on the element > open Settings.
- Click Get CSS Info to reveal the CSS ID Selector.
In the top bar, navigate to Settings and open the Custom CSS section. Then, add the following script to hide each test group by default.
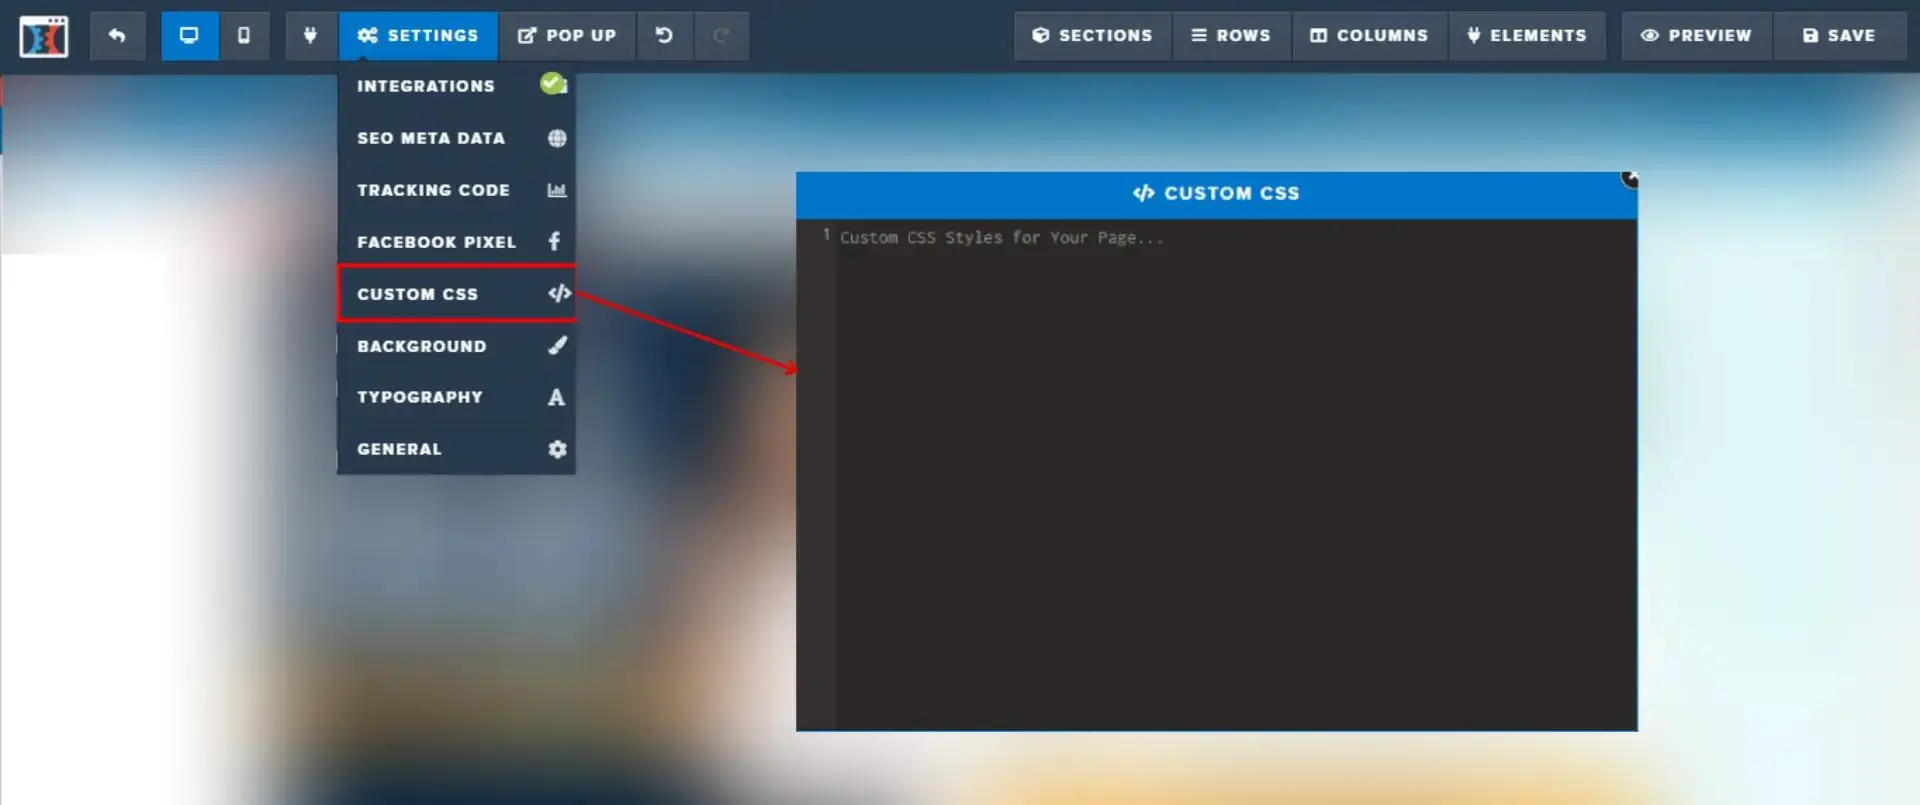
This keeps the layout clean and prevents variant elements from showing when not in use.
Step 5: Add A/B Test Script to the Page
From the top menu, click on the Settings dropdown and select Tracking Code. When the pop-up window appears, switch to the Footer Code tab and paste the adjusted code snippet there.
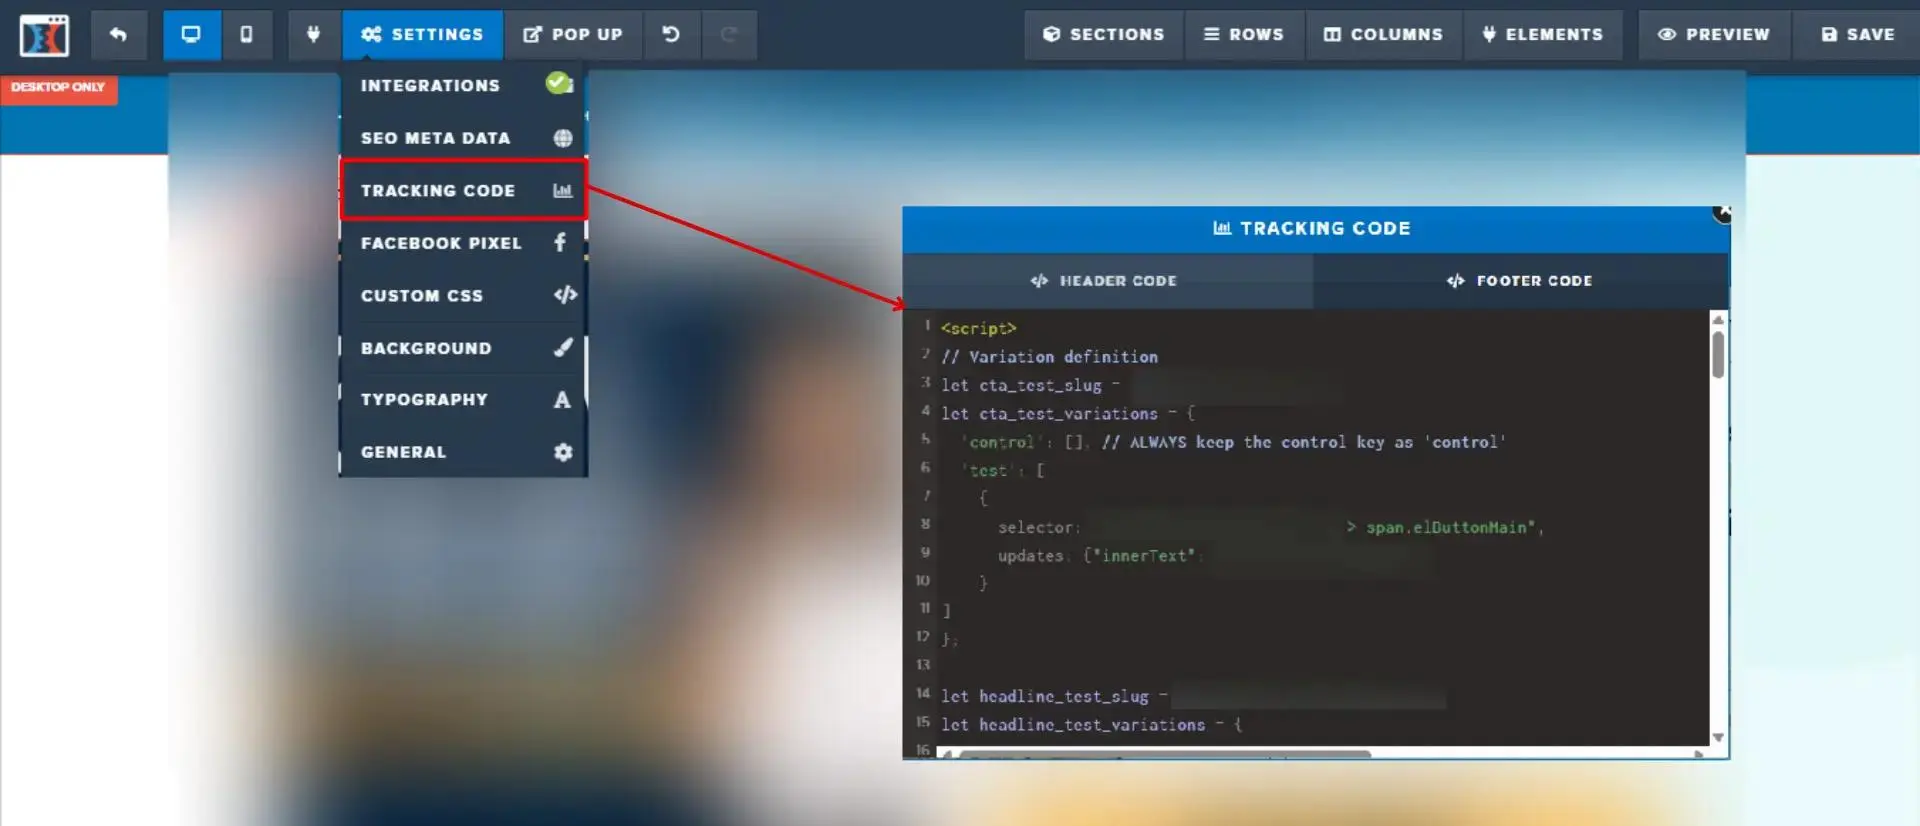
Make sure to replace:
- *YOUR_FEATURE_FLAG_KEY* with the actual Feature Flag Key from your PostHog experiment.
- *original-element* and *variant-one-element* and *variant-two-element* with the actual CSS IDs of the control and test elements.
Step 6: Quality Check the Variants
We start by previewing the page and confirming that our test is set up properly. To check each variant, we use the feature flag key directly in the page URL:
Format:[your page URL]/?[Feature Flag Key]=[variant name]
Repeat this for each variant to ensure they render as expected.
For example, we’ve built a dedicated test page on our website to run an A/B test. In this experiment, we have one control group and two test variations: Test Group 1 and Test Group 2.
To verify that each variant is loading correctly, we add the Feature Flag Key to the end of the URL like the upper format:
Test Group 2:
https://99ways.instawp.dev/experiment-test-page/?001-about-page-Heading-test=test_group_2

Step 7: Publish Your Test on PostHog
To track what success means for your experiment:
- Open the saved experiment in PostHog.
- Scroll to Primary metrics > click Add primary metric.
- Choose Funnels as the type and define funnel steps (e.g., CTA clicked → form visited).
- Adjust the attribution type, conversion window, and save.
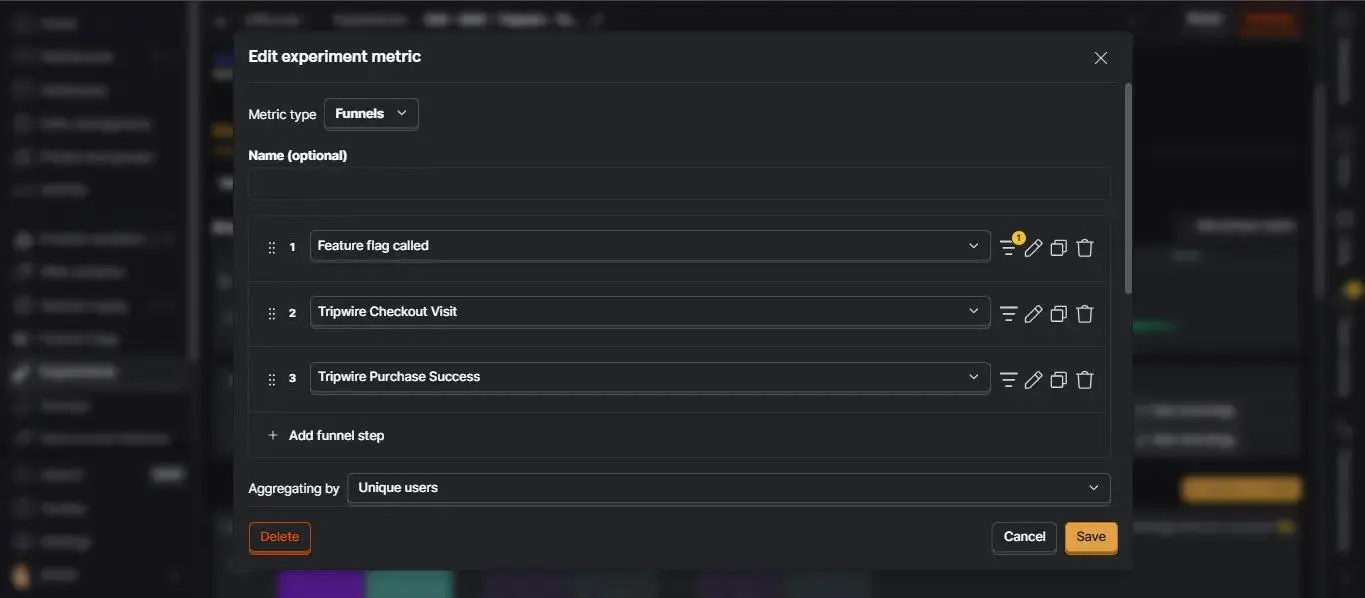
Then scroll up and hit Launch.
Once launched, the experiment goes live and PostHog begins tracking performance based on the metric we set.
For a deeper understanding of how experiment metrics work, take a look at the linked article.
Once you’ve verified the test setup is working correctly, update the duplicated page’s URL to the original live URL. Then, change the original page’s URL to something else to avoid conflicts.
Frequently asked questions
Why should I clone the ClickFunnels page before making test changes?
Clone the intended ClickFunnels page first: use Clone Funnel Step, rename the cloned step in Publishing, and click Update Funnel Step to save it. The article presents this duplication as protection for the original from unintended changes.
Do I always need to create test elements directly on the page?
No, not always. This guide adds test elements because of the complexity of this A/B test, but for simpler cases you can apply changes through the A/B test script alone and skip adding extra elements manually.
What naming format should I use for the experiment and feature flag key?
Use [Experiment number] – [Step of the Funnel/Page] – [Test Hypothesis] as the general experiment-name format. Make the feature flag key similar to the experiment name by converting the funnel step or page to a number or abbreviation, removing spaces, and using lowercase for easier implementation in code.
How should I prepare the control and test versions?
Keep the content versions on the same page layout and prepare a control plus test versions. Build a missing element from scratch or duplicate and modify an existing element to limit differences other than the hypothesis; label the original Control and the test versions TG1, TG2, and so on. The test group can be an element, section, row, or column.
Why hide test groups with Custom CSS, and which identifier do I need?
Hide the test elements on the Control page so the footer script can manage the test, and retrieve each element’s CSS ID Selector. Click on the element, open Settings, and click Get CSS Info to reveal the selector.
Which placeholders must I replace in the test script?
Replace *YOUR_FEATURE_FLAG_KEY* with the actual Feature Flag Key from the PostHog experiment, and replace *original-element*, *variant-one-element*, and *variant-two-element* with the actual CSS IDs of the control and test elements.
How do I quality-check each variant before launching?
Preview the page first, then use the feature flag key and variant name in the URL format [your page URL]/?[Feature Flag Key]=[variant name]. Repeat the check for each variant and confirm that they render as expected.
What should I configure to define experiment success?
Open the saved experiment, add a primary metric, choose Funnels, and define the funnel steps, such as CTA clicked → form visited. Adjust the attribution type and conversion window before saving.
What should I do after verifying the test setup?
After verifying that the test setup works correctly, update the duplicated page’s URL to the original live URL, then change the original page’s URL to something else to avoid conflicts.